Apache Tomcat on CentOS: Installation, systemd, and Safe Defaults
Publication date:
Updated:
INFORMATION > Apache Tomcat on CentOS: Installation, systemd, and Safe Defaults
Bottom line: Choose a supported Tomcat family and compatible JDK first, then run it as a dedicated non-login user under a reviewed systemd unit. Keep configuration and deployed applications separate from immutable binaries, and expose only the connector architecture you need.
What you'll learn
- How Java compatibility, installation source, service identity, file ownership, logs, and startup order fit together.
- Why fixed legacy heap and GC flags should not be copied without measurements.
- How to distinguish the original CentOS 7 package layout from a current supported deployment.
Who this is for: Linux administrators maintaining or migrating a Tomcat service.
2026 context: The walkthrough below reflects an older CentOS 7/Tomcat package and includes JVM options that may be removed or inappropriate on current Java. Tomcat 7 is end-of-life; verify the official version matrix, use a supported branch, and review the exact service unit and permissions before production use.
Overview
This section describes the initial configuration steps required to install and start Tomcat on CentOS, assuming CentOS7 is used.
The walkthrough also records an Apache reverse-proxy configuration and a custom log destination. Both require review against the supported Tomcat release and current operating-system packaging.
Tested versions:
| CentOS Version | 7.6 (1810) |
|---|---|
| Apache Version | 2.4.6 |
| Tomcat Version | 7.0.76 |
| Java Version | OpenJDK 1.8.0_272 64bit |
Table of Contents
1. install
This section describes the configuration of Tomcat from installation to startup.
1-1. Installing Tomcat
Use yum command to install Tomcat.
[username@hostname ~]$ su -
[root@hostname ~]# yum -y install tomcat
2. Legacy Tomcat configuration walkthrough
This section describes the setup of Tomcat from installation to startup. The yum mentioned earlier will create "/usr/share/tomcat". Here are the shortcut links to the configuration file folders, etc., and we will modify them.
2-1. Tomcat Path Settings
This is the shell equivalent of configuring environment variables on Windows. A service manager does not necessarily inherit a user's shell profile, so service variables should be defined in the location supported by the packaged unit.
This is not necessary if tomcat.conf contains the setting "CATALINA_HOME="/usr/share/tomcat". Check "/usr/share/tomcat/conf/tomcat.conf".
If "CATALINA_HOME="/usr/share/tomcat" is not present, add it by following the steps below.
[root@hostname ~]# vi /etc/profile
Add the following at the end
CATALINA_HOME=/usr/share/tomcat
export CATALINA_HOME
This completes the specification of Tomcat environment variables.
Tomcat also requires a compatible Java runtime. The related OpenJDK guide explains the historical alternatives configuration; current installations should use the JDK and service environment supported by their Tomcat package.
Install Java on CentOS, set path
It can also be installed by executing "yum install java-1.8.0-openjdk".
2-2. Startup Confirmation
Check if Tomcat starts.
In the historical CentOS package split, the default Tomcat landing page was supplied by the separate tomcat-webapps package. A production server does not require that demonstration application and should not expose administrative or sample applications unnecessarily.
[root@hostname ~]# yum -y install tomcat-webapps
Next, activate firewall, which opens port 8080 since Tomcat's default port number is 8080.
[root@hostname ~]# firewall-cmd --permanent --zone=public --add-port=8080/tcp
[root@hostname ~]# firewall-cmd --reload
[root@hostname ~]# firewall-cmd --list-all
public (active)
target: default
icmp-block-inversion: no
interfaces: eth0
sources:
services: dhcpv6-client http https ssh
ports: 8080/tcp
protocols:
masquerade: no
forward-ports:
source-ports:
icmp-blocks:
rich rules:
Confirm that 8080/tcp appears only if direct network access to the connector is actually required. When Apache or another reverse proxy is on the same host, binding Tomcat to a private interface and keeping the port closed may be safer.
[root@hostname ~]# tomcat start
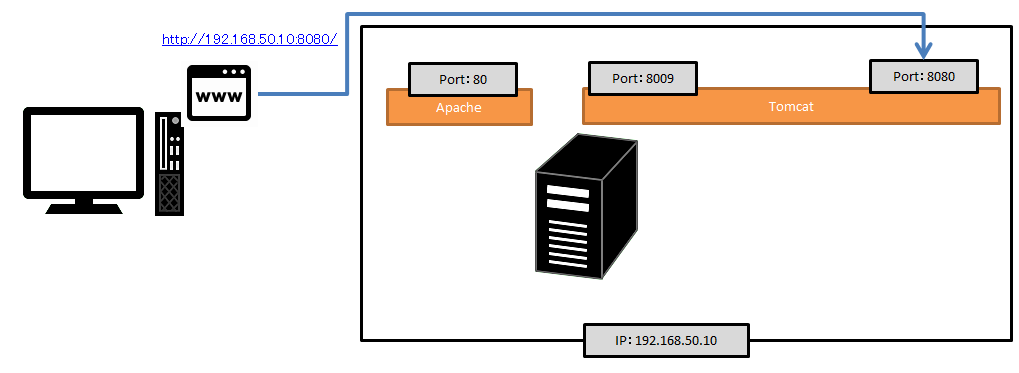
Access the site from a browser. In my case, the IP address of the server is 192.168.50.10, so I access "http://192.168.50.10:8080/". It is OK if the following page is displayed.
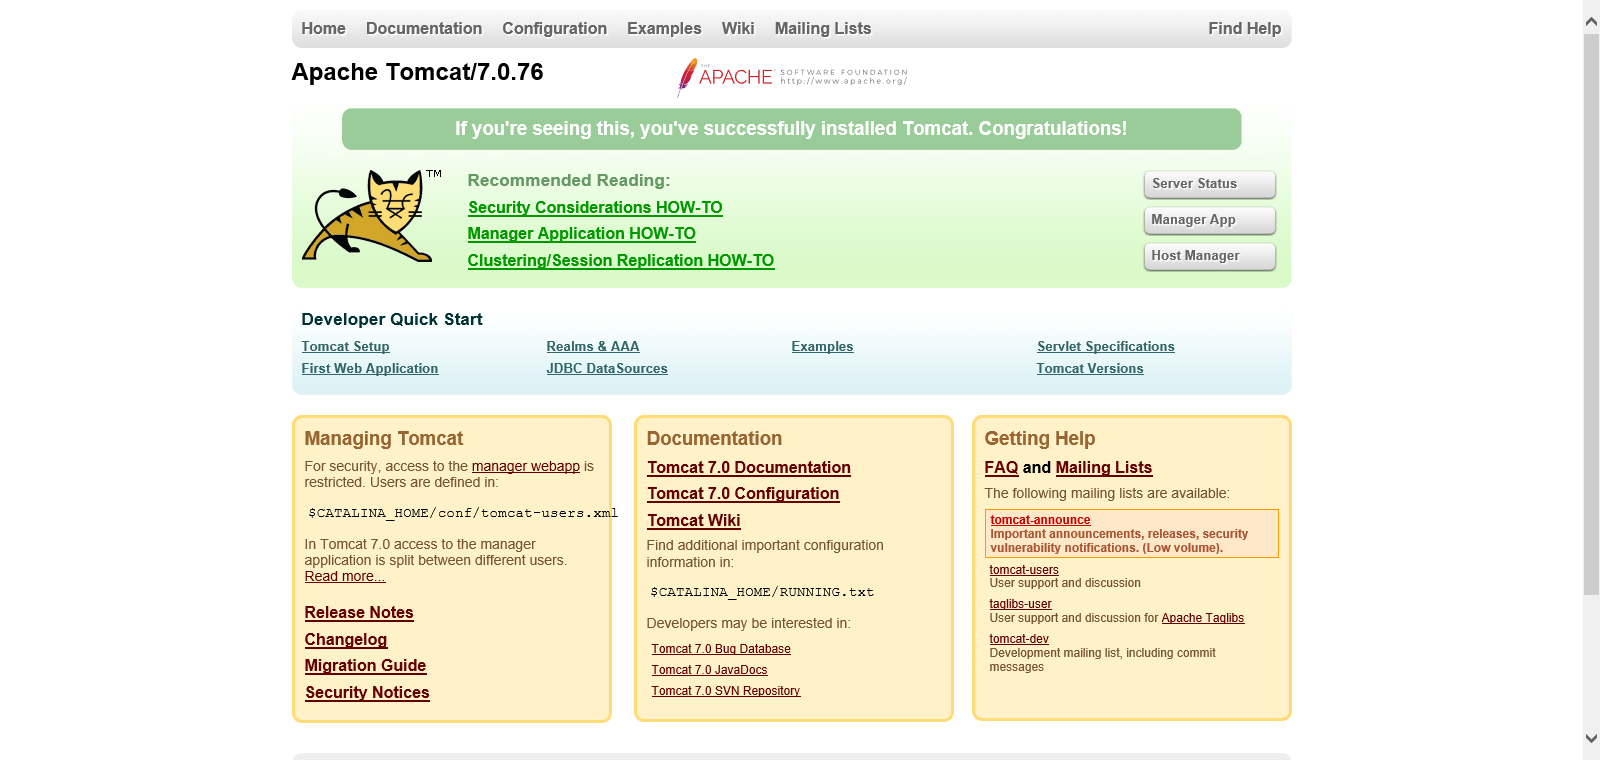
After confirming that the startup was successful, Tomcat is stopped.
[root@hostname ~]# tomcat stop
2-3. Apache and Tomcat integration settings
This section is optional. Tomcat can serve HTTP directly; add Apache HTTP Server only when its TLS, routing, access-control, integration, or shared-edge features justify another component. Do not assume that a proxy will automatically make static content faster.
The related Apache guide records the corresponding historical installation.
Initial configuration required from installation of Apache on CentOS to startup
The following historical Apache configuration forwards matching requests to Tomcat. This description assumes that there is an Apache configuration file under "/etc/httpd/".
[root@hostname ~]# vi /etc/httpd/conf/httpd.conf
Add the following statement to the end of "httpd.conf".
<Location / >
ProxyPass ajp://localhost:8009/
Order allow,deny
Allow from all
</Location>
As a prerequisite, the following modules must be enabled, if not already enabled. (uncomment out #).
• LoadModule proxy_module modules/mod_proxy.so
• LoadModule proxy_ajp_module modules/mod_proxy_ajp.so
Start Apache (restart if already started) and Tomcat.
[root@hostname ~]# apachectl stop
[root@hostname ~]# apachectl start
[root@hostname ~]# tomcat start
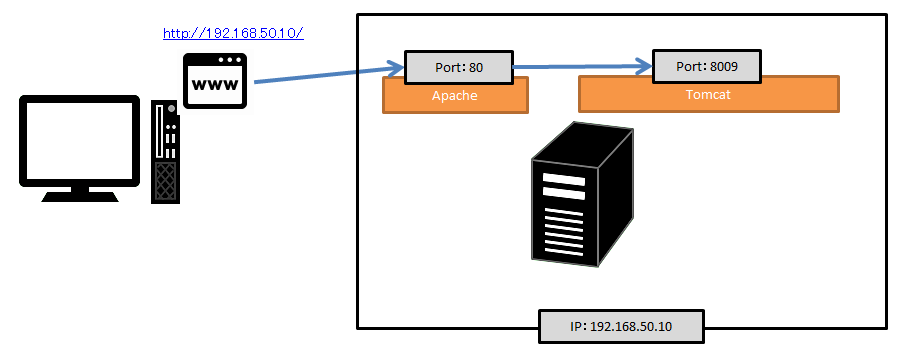
Access the site from a browser. In my case, the IP address of the server is 192.168.50.10, so I access "http://192.168.50.10/".
If the expected page is returned through Apache, the basic proxy path is working. Also verify forwarded scheme and host information, error handling, timeouts, and that the Tomcat connector is not exposed beyond its intended trust boundary.
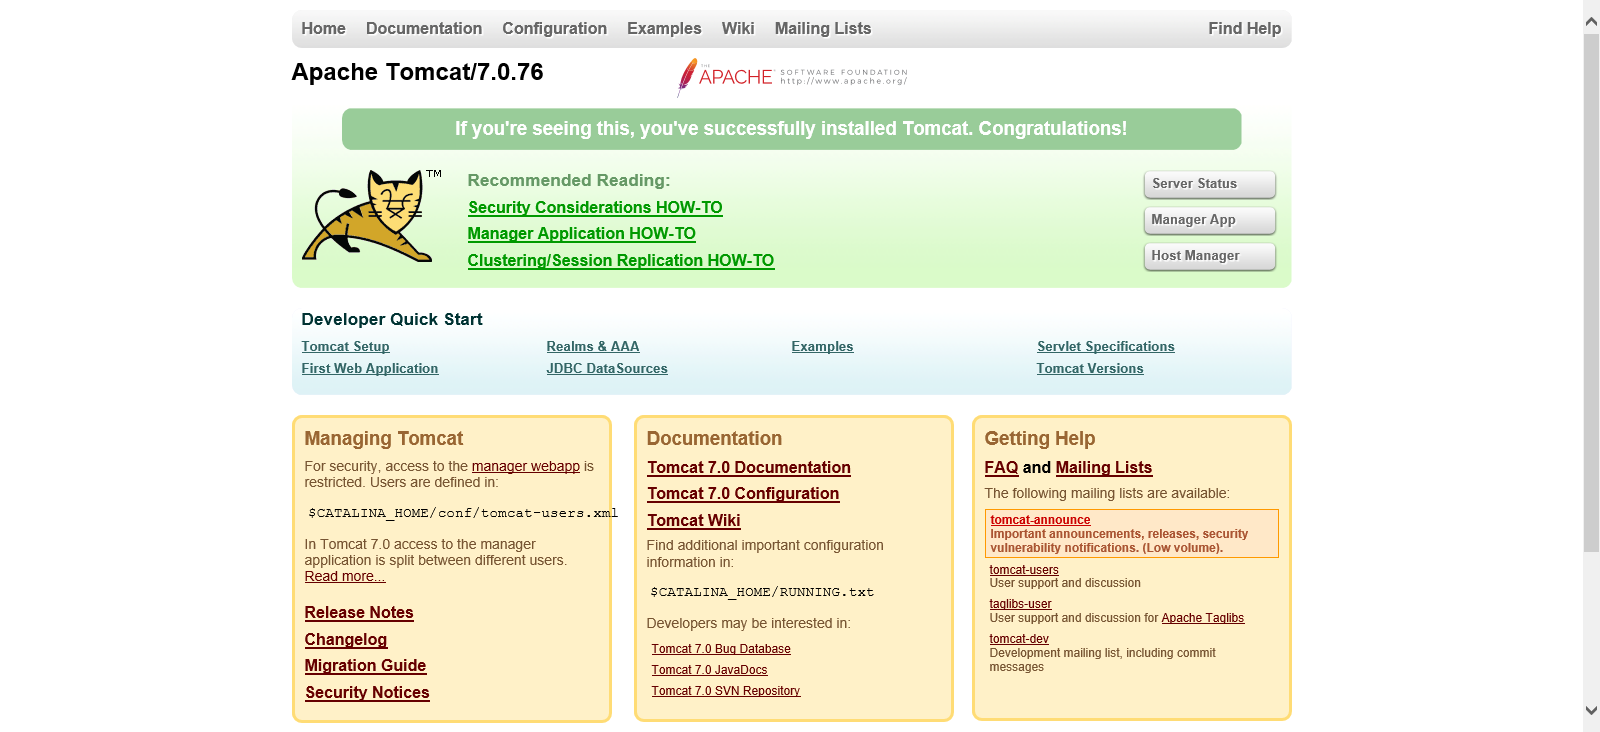
After confirming that the startup was successful, Tomcat is stopped.
[root@hostname ~]# tomcat stop
The figure shows the following access.
Incidentally, the previous procedure was accessed as follows.
2-4. java heap, gc log settings
Java heap is Java memory and gc log is a log about Java memory. Java uses a set amount of memory set up as a heap for processing. Both are set as options to the Java startup command. We will set it in "tomcat.conf".
[root@hostname ~]# vi /usr/share/tomcat/conf/tomcat.conf
The following information is added at the end of this document.
CATALINA_OPTS="-server -XX:MaxMetaspaceSize=256m -XX:MetaspaceSize=256m -Xmx256m -Xms256m -Xloggc:/var/log/tomcat/gc.log -XX:+PrintGCDetails"
After starting Tomcat, inspect the process only to confirm which JVM arguments were applied. The options shown in this historical example are not a current tuning recommendation; several logging flags changed in later Java releases.
[root@hostname ~]# tomcat start
[root@hostname ~]# ps aux | grep java
/usr/lib/jvm/jre/bin/java -Djavax.sql.DataSource.Factory=org.apache.commons.dbcp.BasicDataSourceFactory -server -XX:MaxMetaspaceSize=256m -XX:MetaspaceSize=256m -Xmx256m -Xms256m -Xloggc:/var/log/tomcat/gc.log -XX:+PrintGCDetails -classpath /usr/share/tomcat/bin/bootstrap.jar:/usr/share/tomcat/bin/tomcat-juli.jar:/usr/share/java/commons-daemon.jar -Dcatalina.base=/usr/share/tomcat -Dcatalina.home=/usr/share/tomcat -Djava.endorsed.dirs= -Djava.io.tmpdir=/var/cache/tomcat/temp -Djava.util.logging.config.file=/usr/share/tomcat/conf/logging.properties -Djava.util.logging.manager=org.apache.juli.ClassLoaderLogManager org.apache.catalina.startup.Bootstrap start
The above configuration will start Tomcat using 256M of memory. Above 256M, Tomcat will be configured to use no memory.
For gc logs, a log file is created under "/var/log/tomcat/" as "gc.log".
Creation of the directory "/var/log/tomcat/" is performed by the following procedure.
2-5. Change log settings
Create a log directory and change the log output path for Tomcat. Logging-related settings are found in "/usr/share/tomcat/conf/logging.properties" and "/usr/share/tomcat/conf/server.xml".
Below is the directory creation.
[root@hostname ~]# mkdir /var/log/tomcat
[root@hostname ~]# chmod 755 /var/log/tomcat
Create a directory and set the permissions to 755. (Tomcat can write logs, but other users can only see them.)
Then, modify "logging.properties".
[root@hostname ~]# vi /usr/share/tomcat/conf/logging.properties
Apply the following change:
1catalina.org.apache.juli.FileHandler.level = FINE
1catalina.org.apache.juli.FileHandler.directory = /var/log/tomcat
1catalina.org.apache.juli.FileHandler.prefix = catalina.
2localhost.org.apache.juli.FileHandler.level = FINE
2localhost.org.apache.juli.FileHandler.directory = /var/log/tomcat
2localhost.org.apache.juli.FileHandler.prefix = localhost.
3manager.org.apache.juli.FileHandler.level = FINE
3manager.org.apache.juli.FileHandler.directory = /var/log/tomcat
3manager.org.apache.juli.FileHandler.prefix = manager.
4host-manager.org.apache.juli.FileHandler.level = FINE
4host-manager.org.apache.juli.FileHandler.directory = /var/log/tomcat
4host-manager.org.apache.juli.FileHandler.prefix = host-manager.
Then, modify "server.xml".
[root@hostname ~]# vi /usr/share/tomcat/conf/server.xml
Apply the following change:
<Valve className="org.apache.catalina.valves.AccessLogValve" directory="/var/log/tomcat"
prefix="localhost_access" suffix=".txt"
pattern="combined" />
2-6. Automatic startup setting
The packaged systemd unit should normally manage startup at boot. Enable and review that unit instead of creating a second competing service definition. Please note that this procedure is for CentOS7, so those who are using other than CentOS7 need to use the Service command.
[root@hostname ~]# systemctl enable tomcat
[root@hostname ~]# systemctl is-enabled tomcat
enabled
[root@hostname ~]# systemctl list-unit-files --type=service | grep tomcat
tomcat.service enabled
[root@hostname ~]# systemctl daemon-reload
2-7. Mail Sending Settings
This mail-session configuration is unnecessary unless the deployed application looks up that JNDI resource. Store credentials in a protected secret source and use the mail provider's current TLS requirements.
First, add a jar. Place the following jar under the tomcat lib (/usr/share/tomcat/lib/lib/) and match the permissions with those of the other libs.
• javax.activation-1.2.0.jar
• javax.mail.jar
Modify "context.xml".
[root@hostname ~]# vi /usr/share/tomcat/conf/context.xml
Add the following to the end of context.xml
<Context>
<Resource name="mail/Session" auth="Container"
type="javax.mail.Session"
/>
</Context>
3. Conclusion
The original walkthrough covers package installation, Java selection, connector access, Apache proxying, JVM options, logging, and service startup. For a current deployment, choose a supported Tomcat and JDK pair, use a dedicated non-login account and the packaged service unit, expose only required connectors, and test configuration and rollback procedures.
Official references
■INFORMATION
■PROFILE
■CONTACT